Sunday 6 November 2011

Case Study - CEPAT


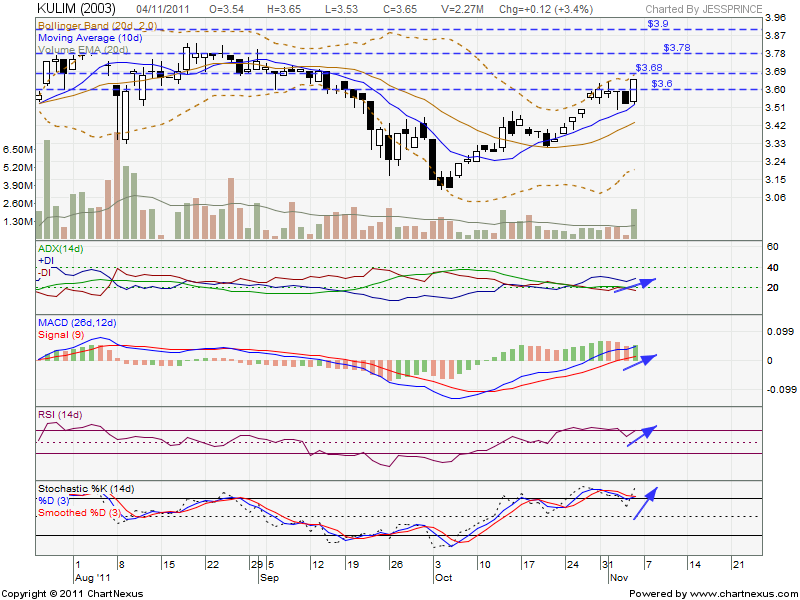
1. Trendline: higher high & higher low - uptrend (bullish)
2. volume higher than 40ema, got fuel (Bullish)
3. BB: both upper & lower band heading north (Bullish)
4. ADX: uptrend with moderate mementum (Bullish)
5. MACD: signal line above 0 (Bullish)
6. RSI: rebounce, pending breakout 70% (Bullish)
7. Sto: rebounce, break out 80%, pending bullish crossover (Bullish)
8. Volume analysis: higher buying pressure (Bullish)

Conclusion: 8 Bull 0 Bear

Position: Long

Entry Price: 1.50
Profit Taking: 1.57
Cut Loss: 1.38

Case Study - LATEXX


1. Trendline: Uptrend (Bullish)
2. ADX: uptrend with strong momentum (Bullish)
3. MACD: signal line above 0, pending 4R1G (Bullish)
4. RSI: Break above 70% (Bullish)
5. Sto: Break above 80% (Bullish)
6. Volume Distribution: high selling pressure (Bearish)

Conclusion: 5 Bull 1 Bear

Position : Long

Entry Price: 1.91
Profit Taking: 1.99, 2.13
Cut Loss: 1.73

Case Study - Kencana


1. Trendline: uptrend (Bullish)
2. ADX: uptrend with weak momemtum (bullsih)
3. MACD : signal line above 0 with 4R1G (Bullish)
4. RSI, rebounce, pending break 70% (Bullish)
5. Sto: rebounce, pending break 80% (Bullish)
6. Volume Distribution: high buying pressure (Bullsih)

Conclusion: 6 Bull 0 Bear

Position: Long

Entry Price: 2.74,
profit taking: 2, 84, 2.93
cut loss: 2. 58

Case Study - GUANCHG


1. Trendline: sideway (Neutral)
2. ADX: Uptrend with moderate momentum (Bullish)
3. MACD: Signal line above 0 with 4R1G (Bullish)
4. RSI: Rebounce from 50%, pending break out 70% (Bullish)
5. Sto: Bullish crossover with signal break 80% (Bullish)
6. Volume Distribution: High buying pressure (Bullish)

Conclusion: 6 BULL 0 BEAR

Positioin: Long

Entry price: 2.52
Profit Taking: 2.61, 2. 71, 2.80
Cut Loss: 2. 37

Case Study - ARMADA

1. Trendline: higher high & higher low - uptrend (Bullish)
2. Candle Stick: rebounce from support (10 ema) (Bullsih)
3. ADX: Uptrend with strong momentum (Bullish)
4. MACD: signal liine above 0 with 4R1G (Bullish)
5. RSI: Rebounce,pending break 70% (Bullish)
6. Sto: Rebounce, pending break 80% (Bullish)
7. Volume Distribution: High selling pressure (Bearish)


Conclusion: 6 Bull 1 Bear

Potiion : Long

Entry Price: 3.82
Profit Taking: 3.91, 4.01, 4.15
Cut Loss: 3.68 / 3.60

Case Study - SACPRES


1. Trendline: Higher high & higher low - uptrend (Bullish)
2. ADX: Uptrend with strong momentum (Bullish)
3. MACD: Signal line above 0, pending for 4R1G (bullish)
4. RSI rebounce, pending crossing 70% (Bullish)
5. Sto: Bullish crossover with signal line break over 80% (Bullish)
6. Volume Distribution: High buying pressure (Bullish)


Conclusion : 6 Bull 0 Bear

Position: Long

Entry Price: 4.21
Profit Taking: 4.28, 4.37, 4.51
Cut Loss: 4.04

Case Study - KULIM


1. Trendline: Higher high & higher low - uptrend (Bullish)
2. Candle Stick: Bullish engulfy (Bullish)
3. ADX: Uptrend with strong momentum (Bullish)
4. MACD: 3R1G with signal line above 0 (Bullish)
5. RSI: Rebounce and pending to break 70% (Bullish)
6. Sto: Break 80% with bullish kissiing, pending bullish crossover (Bullish)
7. Volume Analysis: High Buying Pressure


Conclusion: 7 Bull 0 Bear

Position: Long

Entry Price: 3.7
Profit Taking: 3.76, 3.81, 3.88
Cut Loss: 3.59